I don’t remember where I heard about ArchiveTeam from, but when I did learn about it I knew I wanted to join in.
I have run Tor relays for over a decade now but always wanted to participate in other volunteer-run services as well. I always felt good when my home servers serve more people than just me. I run an I2P node too, but CPU-and-GPU-heavy tasks like Folding@Home are out usually due to excessive power consumption and noise.
The problem with ArchiveTeam is, the instructions online aren’tvery good meaning my ArchiveTeam always gets reset upon reboot which always sucks.
So I decided to take a slightly different path towards running ArchiveTeam Warrior in Podman on Rocky Linux 9, meaning using quadlets so it’s on 24/7.
First off, you should install Podman if you haven’t already:
dnf install -y podman
If you’re running another RHEL-like system (CentOS Stream, AlmaLinux, et al.) or Fedora the command should be the same. If you’re running a non-Red Hat-based distro you might have to use apt, pacman, zypper, et al.
Next, edit the /etc/containers/systemd/archiveteam-warrior.container file and insert this:
The good thing is Podman takes care of the firewalld rules (at least it did for me). To top that off systemd automatically starts Warrior at boot (assuming you have WantedBy=multi-user.target default.target).
Asmentionedearlier, my homelab server is a HPE ProLiant ML110 Gen11 which is a single-socket Intel Sapphire Rapids-based server. One problem with this server is how much noise it generates. I swear, the ML110 Gen10 was much quieter.
It’s a big trouble especially since right now I’m “houseless” meaning I’m living with my brother and have my ML110 in a bedroom closet. However, with the default power settings it’s still very noisy especially when running a cluster of Tor relays.
To fix this:
Log into iLO.
Go to Power & Thermal.
Click Power Settings.
In the Power Regulator Settings, select Static Low Power Mode.
you’ve done that, select Apply.
While noise won’t go completely, it’ll become pretty bearable when inside a closet. And oh, it’ll run cooler.
Keep in mind that there might be some performance penalty as it’s on a low power mode. I haven’t done benchmarks so I don’t know by how much.
I’ve made it back eastwards! Yay! While my family looks for NYC hosing, I’m living in Stamford, CT in my brother’s townhouse/condo.
The condo has Frontier FiberOptic. But as Connecticut is a former AT&T market, unless you’re on XGS-PON which I’m not, GPON is based off AT&T Fiber with the infamous 802.1X requirement.
Initially, I used a Wi-Fi to Ethernet bridge but after having performance issues, I moved the Cat6 drops to near my equipment and “bypassed” the Frontier gateway.
The good news is the older AT&T Fiber bypass methods work on Frontier FiberOptic in Connecticut. The guide which can be followed is the AT&T Bypass thread on the MikroTik forums, namely the bridge method.
There is also a supplicant method but I haven’t tested this. And even if Frontier GPON in Connecticut is based off AT&T Fiber Frontier is not AT&T so the certificates may be different. I remember hearing about a decade ago about AT&T-to-Frontier migration troubles so I’ll assume they’re different.
You may also be able to bypass on other routers such as pfSense/OPNsense or Ubiquiti but I haven’t tested this. My IPv6 tunneling setup uses L2TP whereas IPv4 traffic is direct DHCP/IPoE. On MikroTik this works great because I can set only an IPv6 default gateway to L2TP while ignoring IPv4
Frontier XGS-PON does not need a bypass as Frontier is moving off 802.1X namely due to the fact that Frontier-acquired Verizon areas never used 802.1X. If you don’t wish to bypass but are fine with a truck roll, ask to get moved to XGS-PON (if available).
For many years, I’ve stuck with OPNsense, first initially since until a couple of years ago I was a die-hard FreeBSD user. But more importantly, by default Linux-based firealls play poorly with CenturyLink’s 6rd.
I’ve been wanting to use a MikroTik as my core router instead of OPNsense for many years, but whenever I tried, 6rd browsing was just so slow for some reason.
A few days ago, I got myself a MikroTik CCR2004-16G-2S+ and intially went IPv4-only. But felt very guilty about it, and wanted my IPv6 back. I did some research, and found out that unlike OPNsense, MikroTik didn’t enable Path MTU Discovery by default.
To fix it, add the following config (source: forum article above):
Path MTU Discovery for some reason isn’t enabled on Linux-based distributions, not just MikroTik but also OpenWrt and Netgear Orbi’s stock firmware.
While I won’t be needing this configuration for very long, I’m moving back to NYC and will likely have Verizon Fios without the PPPoE and 6rd nonsense. But in the meanwhile, do we really want more IPv4-only traffic?
But had I known, I could’ve gone with MikroTik all along instead of settling for inefficient x86 boxes. Instead, I once even dealt with a psycho eBay seller for firewall hardware that could’ve been avoided if I read the linked post a year back.
In my homelab, I have a Rocky Linux 9 server/hypervisor. For quite a while, I’ve just used the command line to manage virtual machines. It was tricky to know which TCP port was used for VNC, and forward it to my Fedora laptop.
I’ve always been dreaming about a Web UI for virtual machines, but didn’t want ESXi or Proxmox, and was pretty dissapointed when I tried SmartOS and OmniOS. One day, I was on Mastodon (or Reddit) and learned that there is a KVM virtual machine module for Cockpit. I was sold.
If you want to know how to set it up, Red Hat has a guide. While technically for RHEL, those instructions should also work for RHEL-like distros, namely Rocky Linux (what I use), AlmaLinux, CentOS Stream, et al. This article is more of a review than a full-blown tutorial.
Cockpit and the respective cockpit-machines isn’t a full-on replacement for ESXi or Proxmox, the feature set is substantly smaller. But for me, who just wants a minimal hypervisor but also wants bare-metal apps, it’s perfect.
The good
VNC forwarding
My Cockpit showing my Windows 2022 Domain Controller’s console
One advantage of Cockpit is that it takes care of VNC consoles. I no longer have to worry about SSH forwarding and getting the correct VNC port myself. Yay!
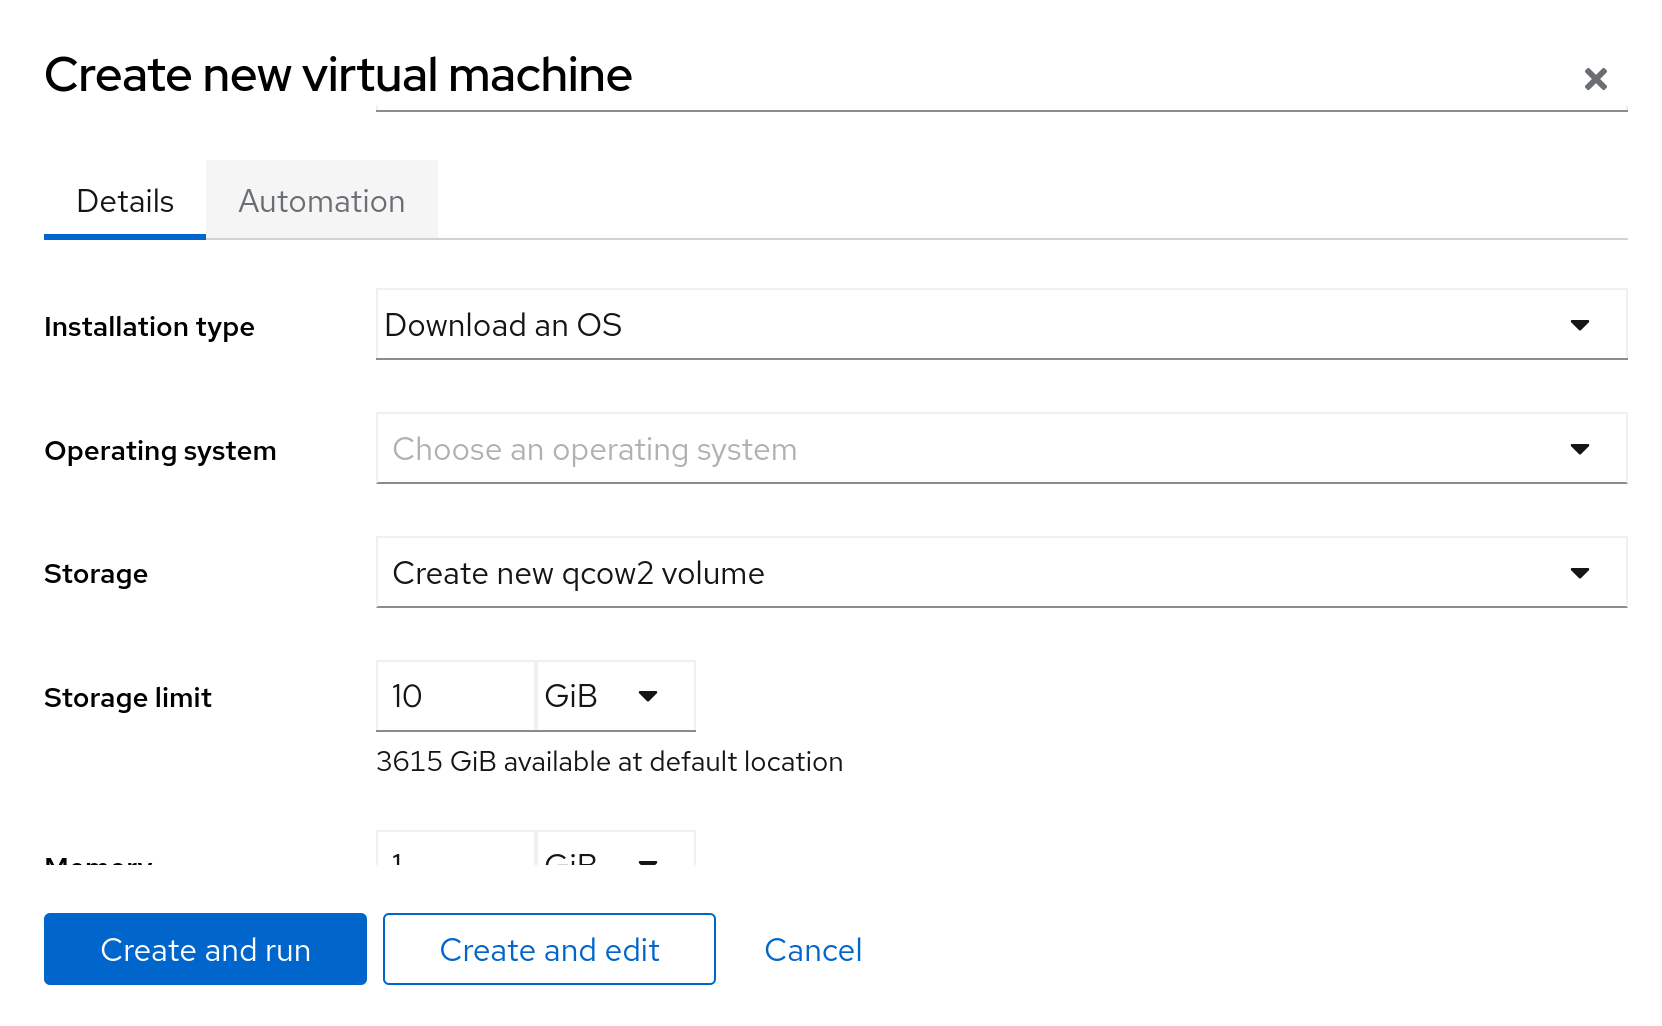
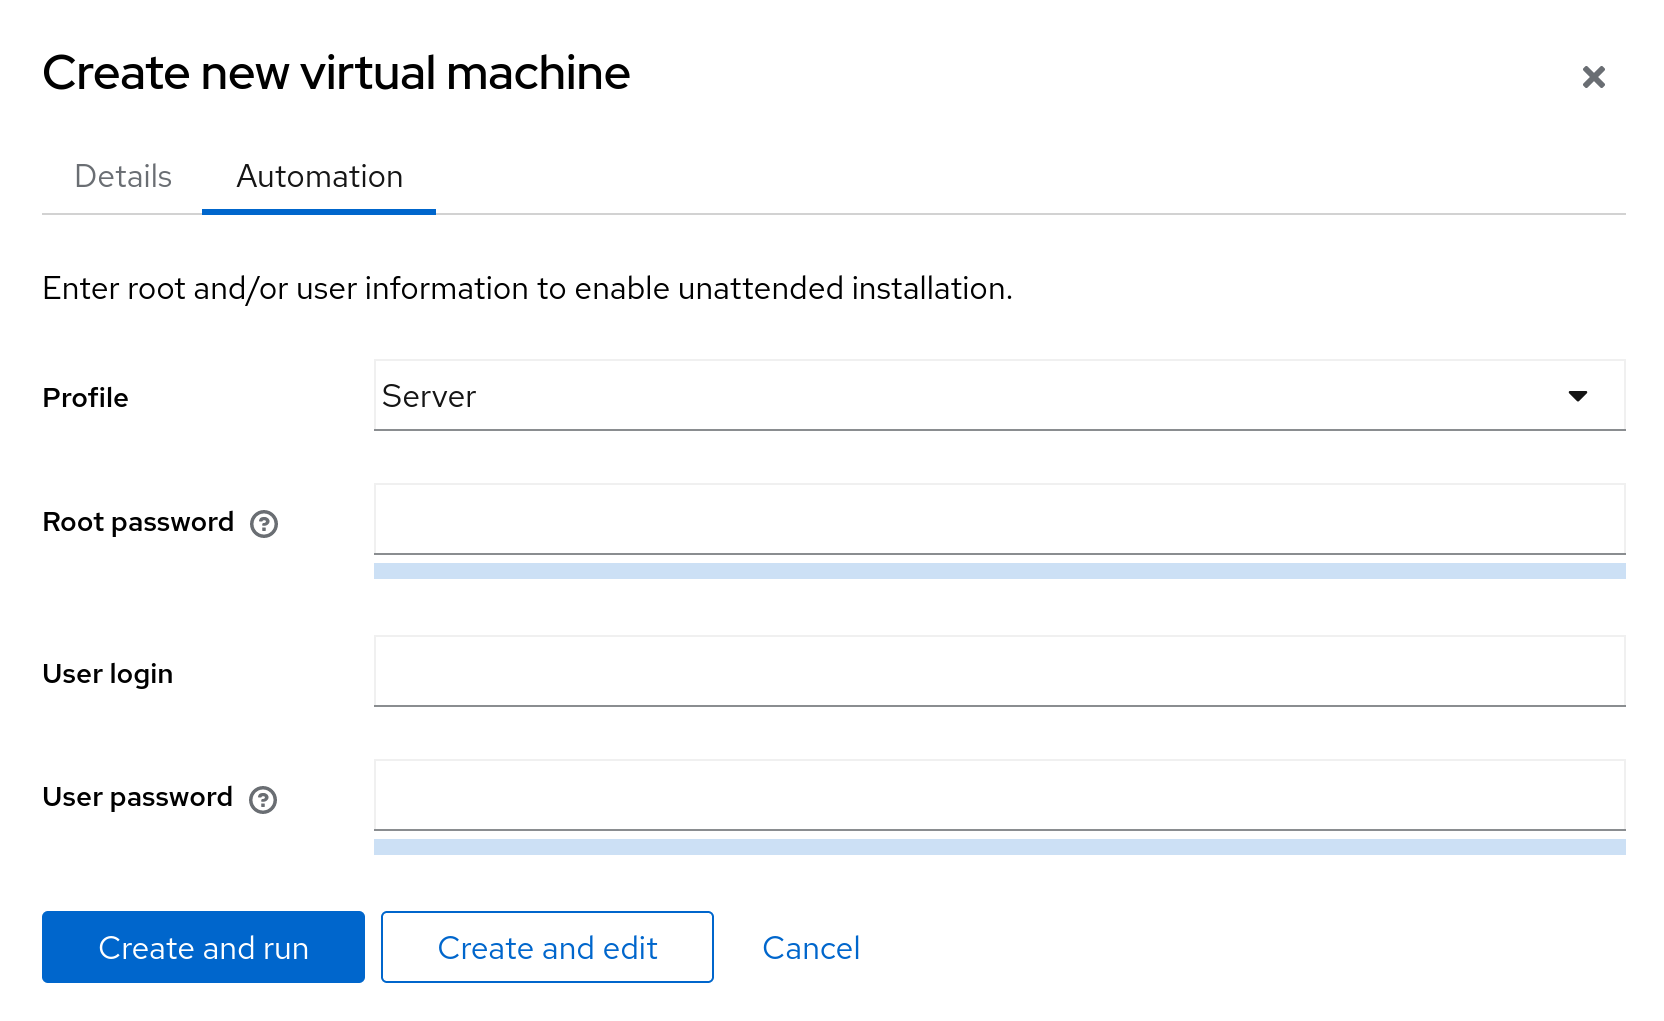
Creating a VM
When setting up a Windows 2022 domain controller in my homelab, I no longer have to find a very long virt-install command. I remember going through my .bashrc just to create a VM every time.
It’s easy to create a UEFI VM, and even “automate” the installation with my own chosen username and password:
However, I still prefer to install manually. I don’t always trust automated tools, and this is no exception.
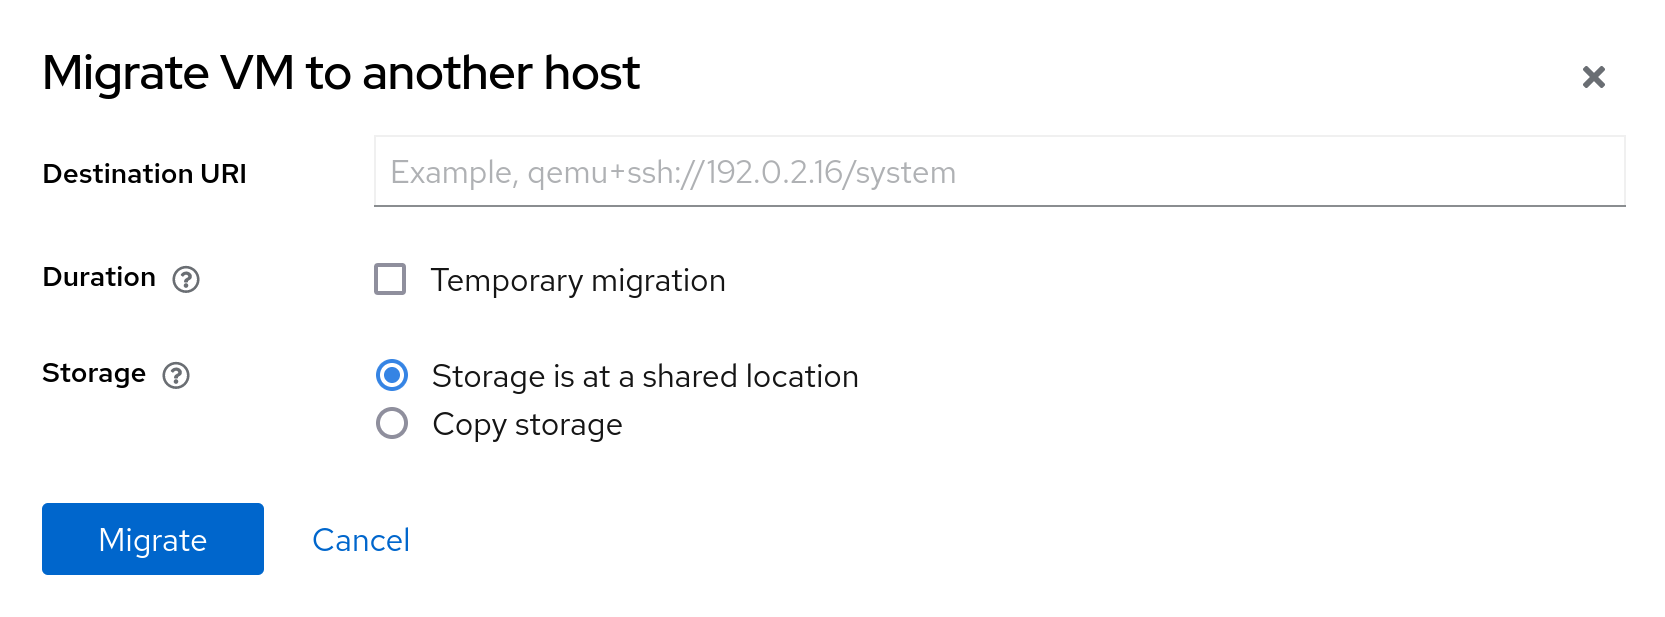
Migrating VMs
While at home, I presently have a single hypervisor (HPE ProLiant ML110 Gen11) and can’t obviously test this, there’s also a migrate option. This is useful for companies and homelabs where multiple hypervisors exist.
Hardware support
The advantage of using Linux over BSD, Windows Server, or ESXi is that a lot of hardware, even consumer-level PCs, will work well enough.
Windows Server with Hyper-V and ESXi aren’t designed for consumer-level PCs, especially with Realtek NICs or Intel 12th Gen or newer with E-cores. BSD works on these systems, but only with so-so hardware support. Linux support on these systems are generally good.
Eventually, I see Windows Server and BSD supporting Intel E-cores too, and probably ESXi too (based on Intel’s roadmap). But then ESXi is no longer free for homelabs, so there’s that.
The bad
Creating a VM
When creating a virtual machine, it doesn’t let you create an image in any pool, only the “default” one, or you have to select an existing image, which then can be in any pool.
I have used a custom storage pool and my new domain controller was in the “default” one. This is even after I disabled the “default” pool; creating a VM re-enabled it.
Interfaces
I use bridge interfaces with my virtual machines. If you want to use a bridge interface, you’ll need a command line to do so. Boo!
For some uses, using NAT is justified, say you’re on a dedicated server with a single public IPv4 address. But in my homelab, I can print ~17 million RFC1918 IPv4 addresses, and even 5 public IPv4s (via a funky VPN), so it’s less relevant.
The ugly
What if I want Debian?
While I haven’t daily-driven Debian for over 11 years at the time of writing, (went from Debian to FreeBSD to openSUSE to now Fedora/Rocky), I’ve read that it’s harder to use cockpit-machines on Debian.
cockpit-machines is a go-to for fans of Red Hat-based distros like me, but I won’t decide for you if you like Debian, or are wary about Red Hat after they tried (and failed) to kill “clones”. Maybe it’s worth it, maybe not.
What if I want FreeBSD?
I’ve actually been a FreeBSD user for nearly 10 years, and even a committer. In fact, Most of my Twitter and Mastodon followers are BSD users. I was a micro-influencer, but I gave up all away and now barely get any engagement since I’m now using Linux outside of my OPNsense box.
I know there’s ClonOS which wants to be a FreeBSD hypervisor OS. But if you wanted Cockpit, no, it doesn’t exist for FreeBSD.
But this article isn’t about FreeBSD, it’s about Rocky Linux and Cockpit.
Server OS versus Hypervisor OS
Some operating systems, such as ESXi, Proxmox, and SmartOS are designed to be hypervisors, with the latter two having some level of containerization support. In turn, they’re designed to host multiple systems out of the box.
Other operating systems, such as traditional GNU/Linux distros, BSD variants, and Windows Server are server operating systems, with a hypervisor added on. While these operating systems can make perfectly good hypervisors, they may not be as advanced as a dedicated hypervisor OS.
It’s like you could go to your bank if you wanted to invest in stocks, but you’re probably going to have a better experience at a traditional brokerage like Fidelity or Charles Schwab (in the US), maybe unless you want to lend against your portfolio. Same with hypervisors.
For me, I don’t need every last feature of ESXi or Proxmox, so cockpit-machines is “good enough” for me, at least after adding a bridge interface. It also helps since I want my Nextcloud on bare-metal, mainly so it has most of my free space. But it may be different for you, and probably is.
Disclaimer: At the time of writing, I work at Microsoft. However, I do not work on Windows, Azure, Hyper-V, or any Linux efforts.
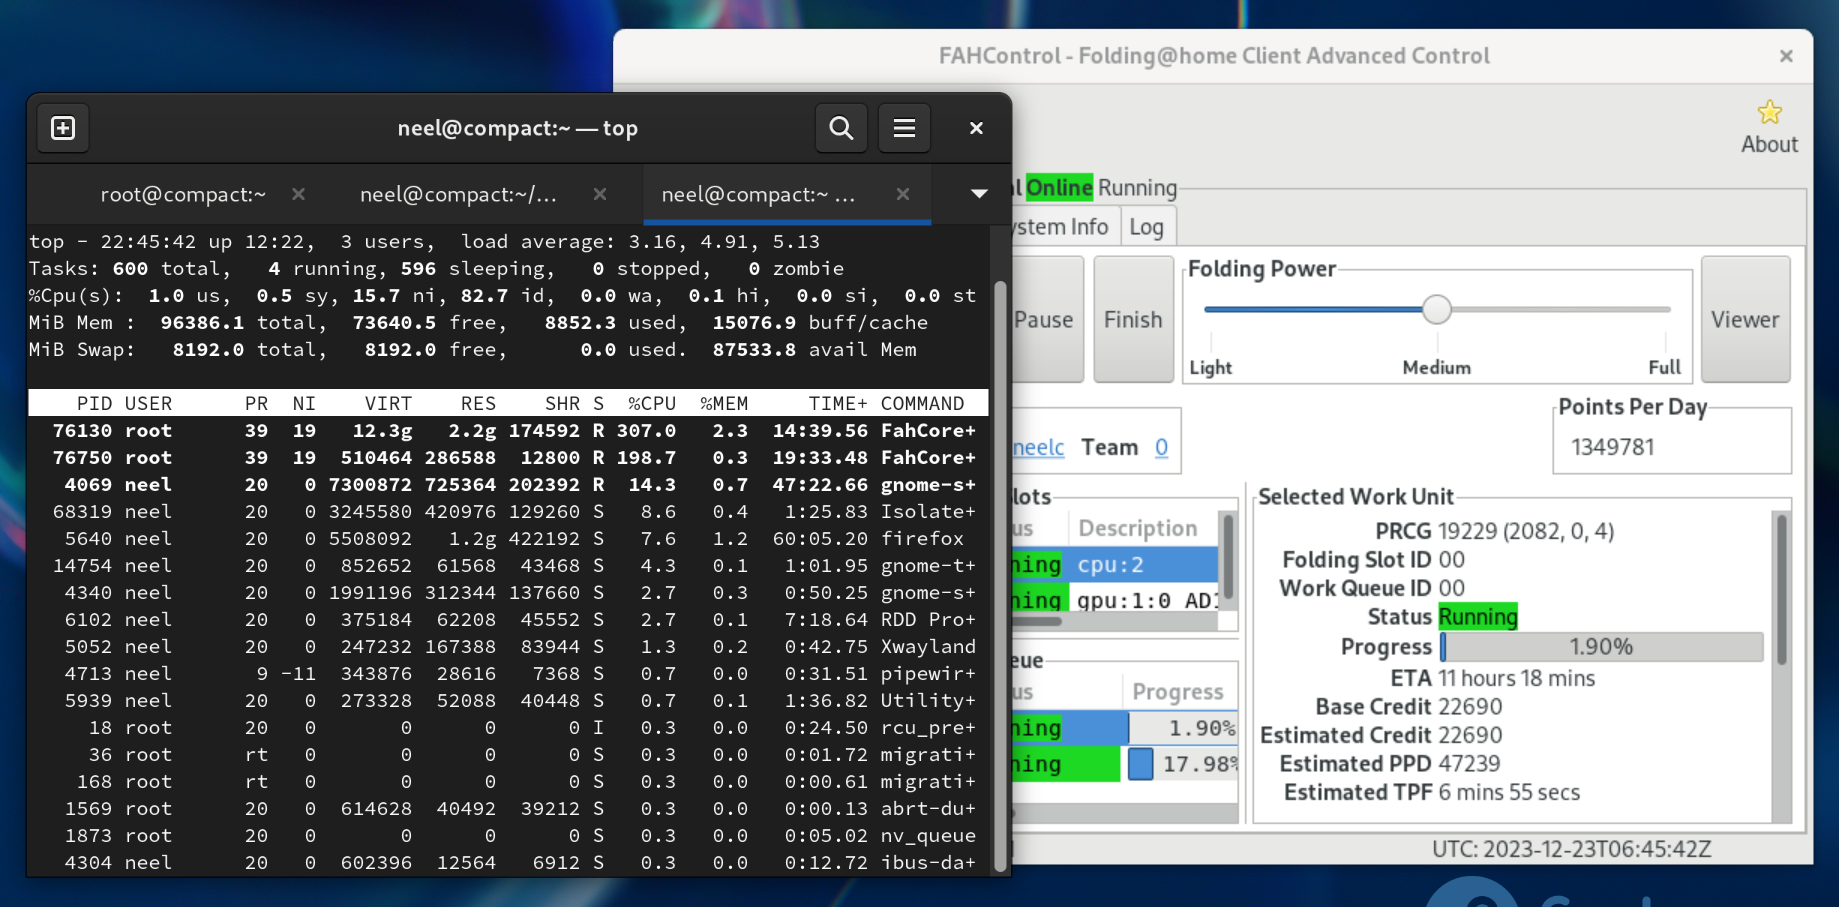
At the present moment, my desktop is technically a “gaming PC” but really a workstation for various non-gaming tasks. It’s a Mini-ITX homebuilt PC with an Intel i9-13900F CPU and a RTX 4070. It runs Fedora 39.
I’ve been wanting to run Folding@home on my main PC for a while now. I run Folding@home at my work systems, both Windows 365 and physical workstation (although I mostly WFH, yay!).
One problem with using the default binaries from the Folding@home website is FAHControl is designed for Python 2. Considering Fedora is the cutting edge distro we know it is, it’s no surprise they’ll deprecate software like candy wrappers.
If you’re just using it “headless” without a GUI, the binaries on the Folding@home website are what you want.
But if you want a GUI, fortunately, there is a Snap package. Yes, I know it’s Snap and not Flatpak, and that Snap is the HD-DVD or CDMA of Linux packaging, but that’s where it’s on.
To install Folding@home, you need to run the following:
One commonly-stated problem with PPPoE, especially done on x86-based routers like pfSense and OPNsense is they’re “single-threaded”.
The reason why they’re single-threaded is because of how NICs are designed. These NICs know how to sort IPv4 and IPv6 traffic, but not PPP traffic. combined with both Linux and FreeBSD processing PPPoE in the thread that process packets.
However, using virtualization and bridge interfaces (not PCIe passthrough), you can mitigate this issue and get real multi-threaded PPPoE.
So what do you need?
Software
Some routers work very well. Despite the terrible reputation, FreeBSD-based routers like OPNsense and pfSense can work with multi-threaded PPPoE if your WAN uses a paravirtualized NIC like virtio. VMware and Hyper-V NICs should also work but I haven’t tested those.
However, if you use FreeBSD, you will need the following in your /boot/loader.conf.local:
If you’re using a Linux-based router distro, like OpenWrt or VyOS, you will need to look into Receive Packet Steering, which does the same thing above on Linux.
Some options to avoid include MikroTik CHR and OpenBSD. Both have single-threaded PPPoE due to their design. On MikroTik, you can’t configure Receive Packet Steering that I’m aware of. OpenBSD seems to not have kernel PPPoE or any packet steering option. If you manage to get RPS with CHR, hit me up at neel AT neelc DOT org.
Virtualize & Bridge
Did I mention you need virtualization? Well, you do. And not only that, you also need to use a bridge interface on the PPPoE WAN.
You may be tempted to use PCIe passthrough, but if you’re dealing with PPPoE, don’t. If you do, you will still have a single-threaded WAN.
While I’m no Linux kernel expert, using a bridge interface means the host OS will not process the packet on a single core, but instead just forward it to the bridge which will then balance it across multiple CPUs.
At least on my host, Rocky Linux 9 with KVM, PPPoE is more-or-less evenly balanced with OPNsense. However, I have not tested ESXi, Windows, or FreeBSD virtualization hosts, but I believe it should be the same also.
As a side unrelated note, in the past I was a big FreeBSD user, but moved on over a year ago outside of OPNsense (but it was more desktop-drive for me).
You must use a paravirtualized NIC. On KVM and bhyve, it’s virtio. on ESXi it’s `vmxnet“. Hyper-V and Xen also have their own respective paravirtualized NICs. Using this allows the guest to have multi-threaded PPPoE.
Notes
There are a few things to keep in mind with this setup:
Host CPU usage will be higher than the guest
Fortunately, it’s via multiple threads (via htop)
You should disable IPv4 and IPv6 on the PPPoE WAN interface
If your ISP uses 6rd and you wish to use it, as I do with CenturyLink in Seattle, DO NOT USE Linux-based firewalls like OpenWrt, CHR or VyOS.
This is because 6rd on Linux-based routers is SLOW when compared to FreeBSD.
However, a Linux host OS will be fine.
Also, not related to the technicalities of this article, but around August 2024, I will be moving to NYC, so I will be unable to test PPPoE after that. This is because Verizon FiOS doesn’t use PPPoE, neither does Spectrum or Optimum if FiOS is unavailable.
Test system
I have multi-threaded PPPoE on the following system:
Host OS: Rocky Linux 9.3 (Linux kernel 5.14.0-362.8.1.el9_3)
Guest OS: OPNsense 23.07 (FreeBSD 13.2-p1)
Virtualization: KVM
Host NIC: Broadcom 57416 OCP3 (dual 10GB)
two bridges: one WAN and one LAN
Guest NIC: virtio
You could probably use a much smaller RAM allocation if you just do “typical” stuff with a few connections. I have 1.5GB RAM is because of my high-bandwidth Tor relays which really crunch the NAT state table: I have ~65000 states at the time of writing, and it went up to ~78000.
At the time of writing I am a CenturyLink Fiber customer in Seattle, WA and its well known that CenturyLink uses PPPoE. Yes, I’m aware of the migration to “Quantum Fiber” which uses DHCP, but I’ll probably move to NYC before I get shifted to Quantum and subsequently have Verizon FiOS (again), also with DHCP.
My home server, a massive HPE ProLiant ML110 Gen11 with a Broadcom 10GbE OCP adapter, I virtualize OPNsense inside of Rocky Linux 9 using KVM, which is directly connected to my (hacked) CenturyLink ONT.
A well-repeated myth is that FreeBSD (the base OS of OPNsense and pfSense) is that PPPoE is single-threaded. As a former FreeBSD committer, I have some understanding on how this works.
The reality is that physical multi-queue NICs only sort native IPv4 and IPv6 across all queues, and use queue 0 for incoming (download) PPPoE traffic. Operating systems (Linux included) process incoming PPPoE frames using the first CPU core on these NICs. However, upstream traffic is generally evenly balanced regardless of OS as the queues are chosen in the operating system.
One way around this is to virtualize OPNsense or pfSense if you use a bridge interface for the WAN and the virtio NIC. This way, assuming I got it correctly, Linux simply forwards the Ethernet frames on the bridge and doesn’t do any processing. The VM and virtio NIC processes PPPoE frames with all cores in the VM.
Replace X with the number of CPU cores allocated to the VM.
If you are running Proxmox, or another Linux distro (e.g. Debian), it should also work since it’s the same Linux kernel. I haven’t tested other operating systems or hypervisors, but it hopefully should be multithreaded there too.
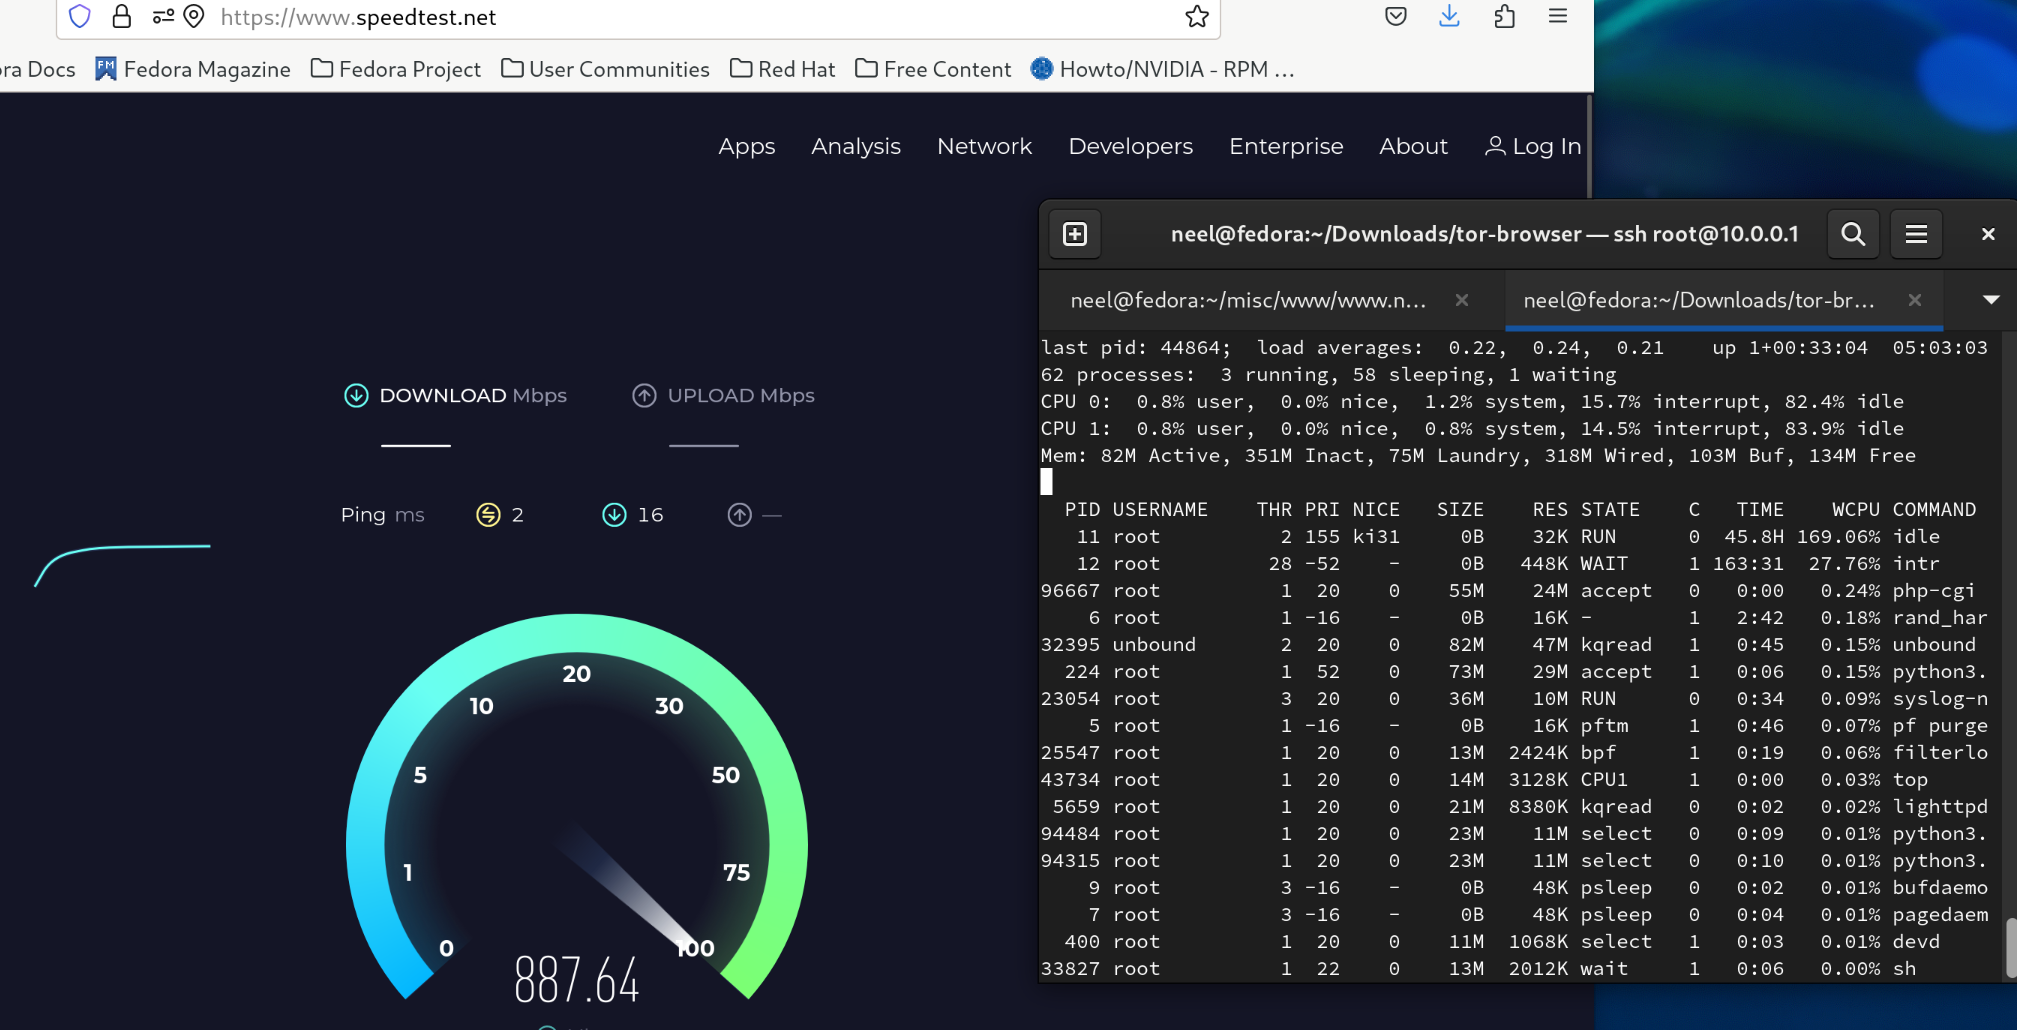
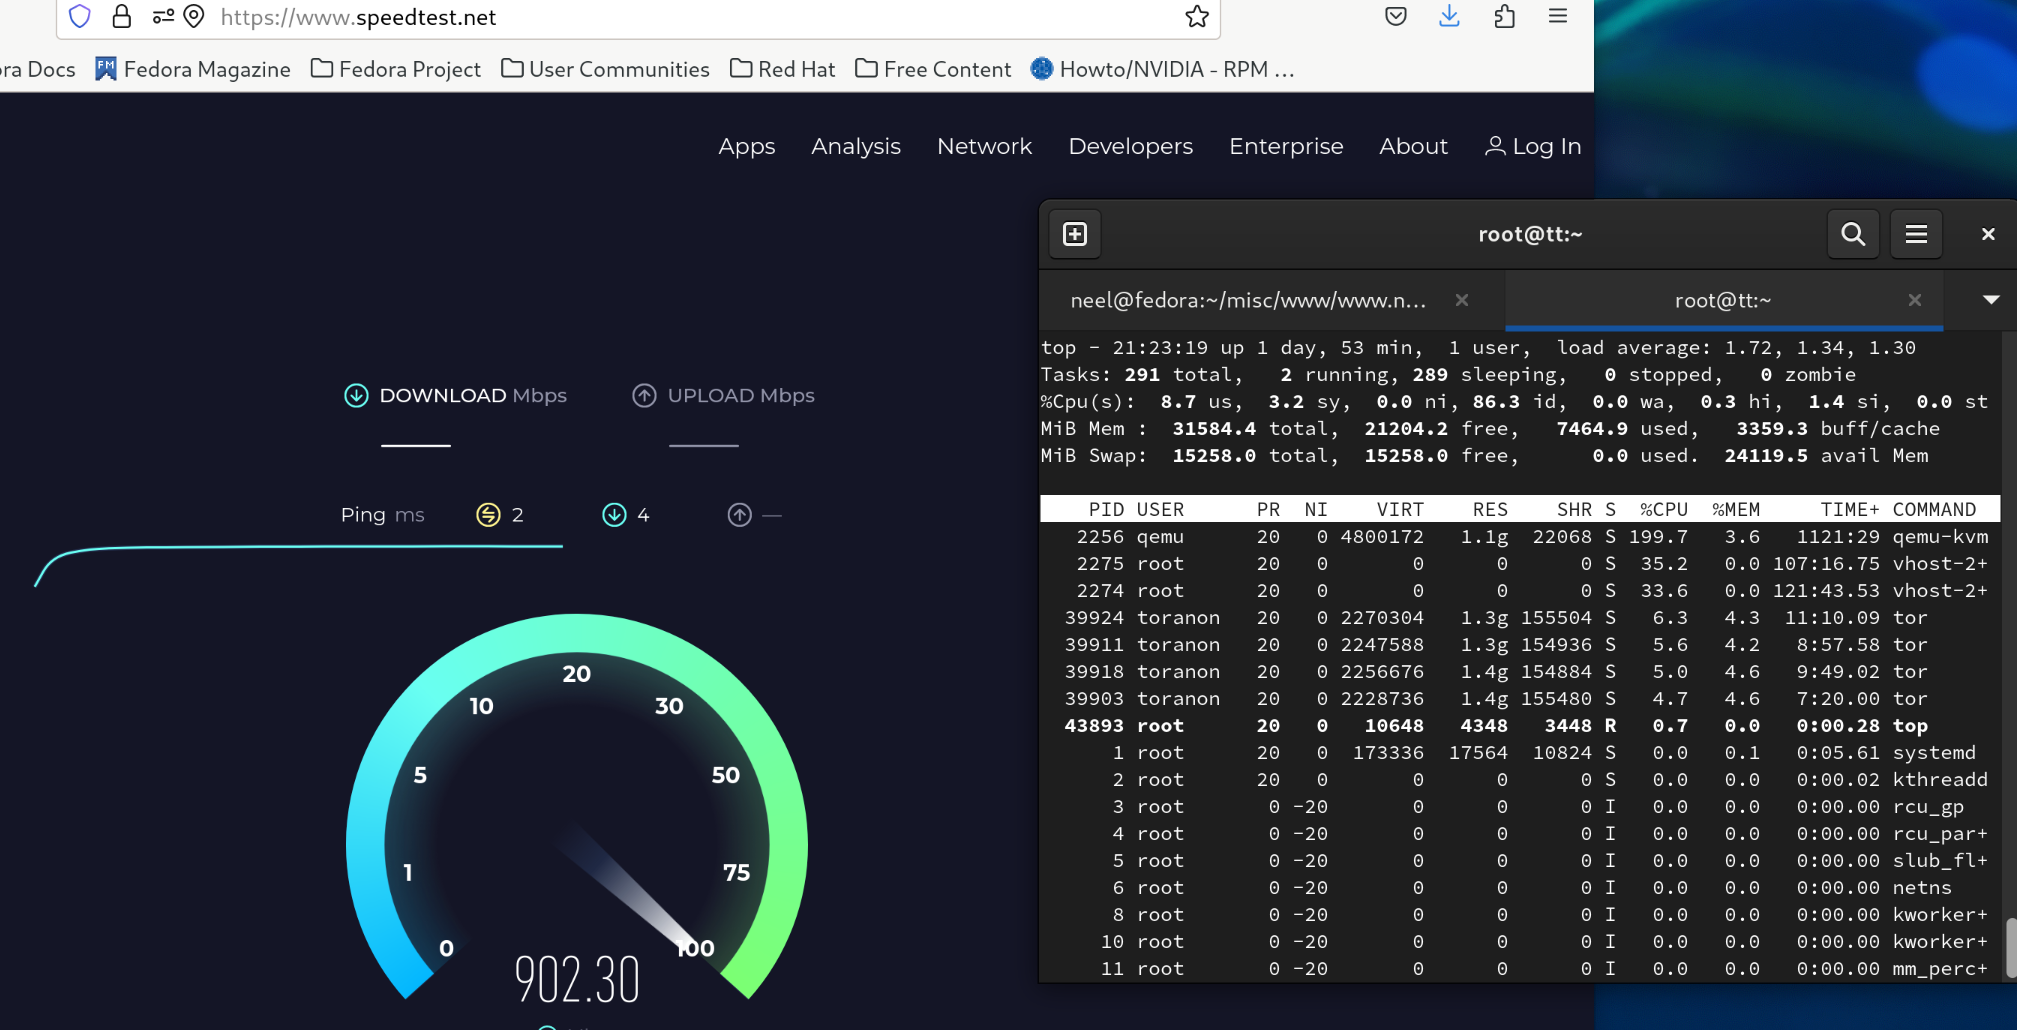
There is one disasvantage if you are virtualizing FreeBSD on KVM: the KVM host will use a lot of CPU usage, more than what FreeBSD will show. FreeBSD is poorly optimized for KVM, which kinda reminds me of MS-DOS and Windows 9x/ME with no idle states whatsoever, just a lot more subtle. I tried MikroTik CHR, and it also has high PPPoE CPU usage, but unlike OPNsense has no option (that I know of) to balance PPPoE traffic. The host CPU could be PPPoE processing, IP routing, virtio, or something else I don’t know about.
Crap, high CPU usage thanks to speedtests.
But regardless, it’s still better than putting everything on CPU 0. Just that if you have multi-Gigabit XGS-PON/10G-EPON PPPoE (e.g. Bell Canada, UTOPIA, NTT OCN), you’ll have to stock up on CPU cores.
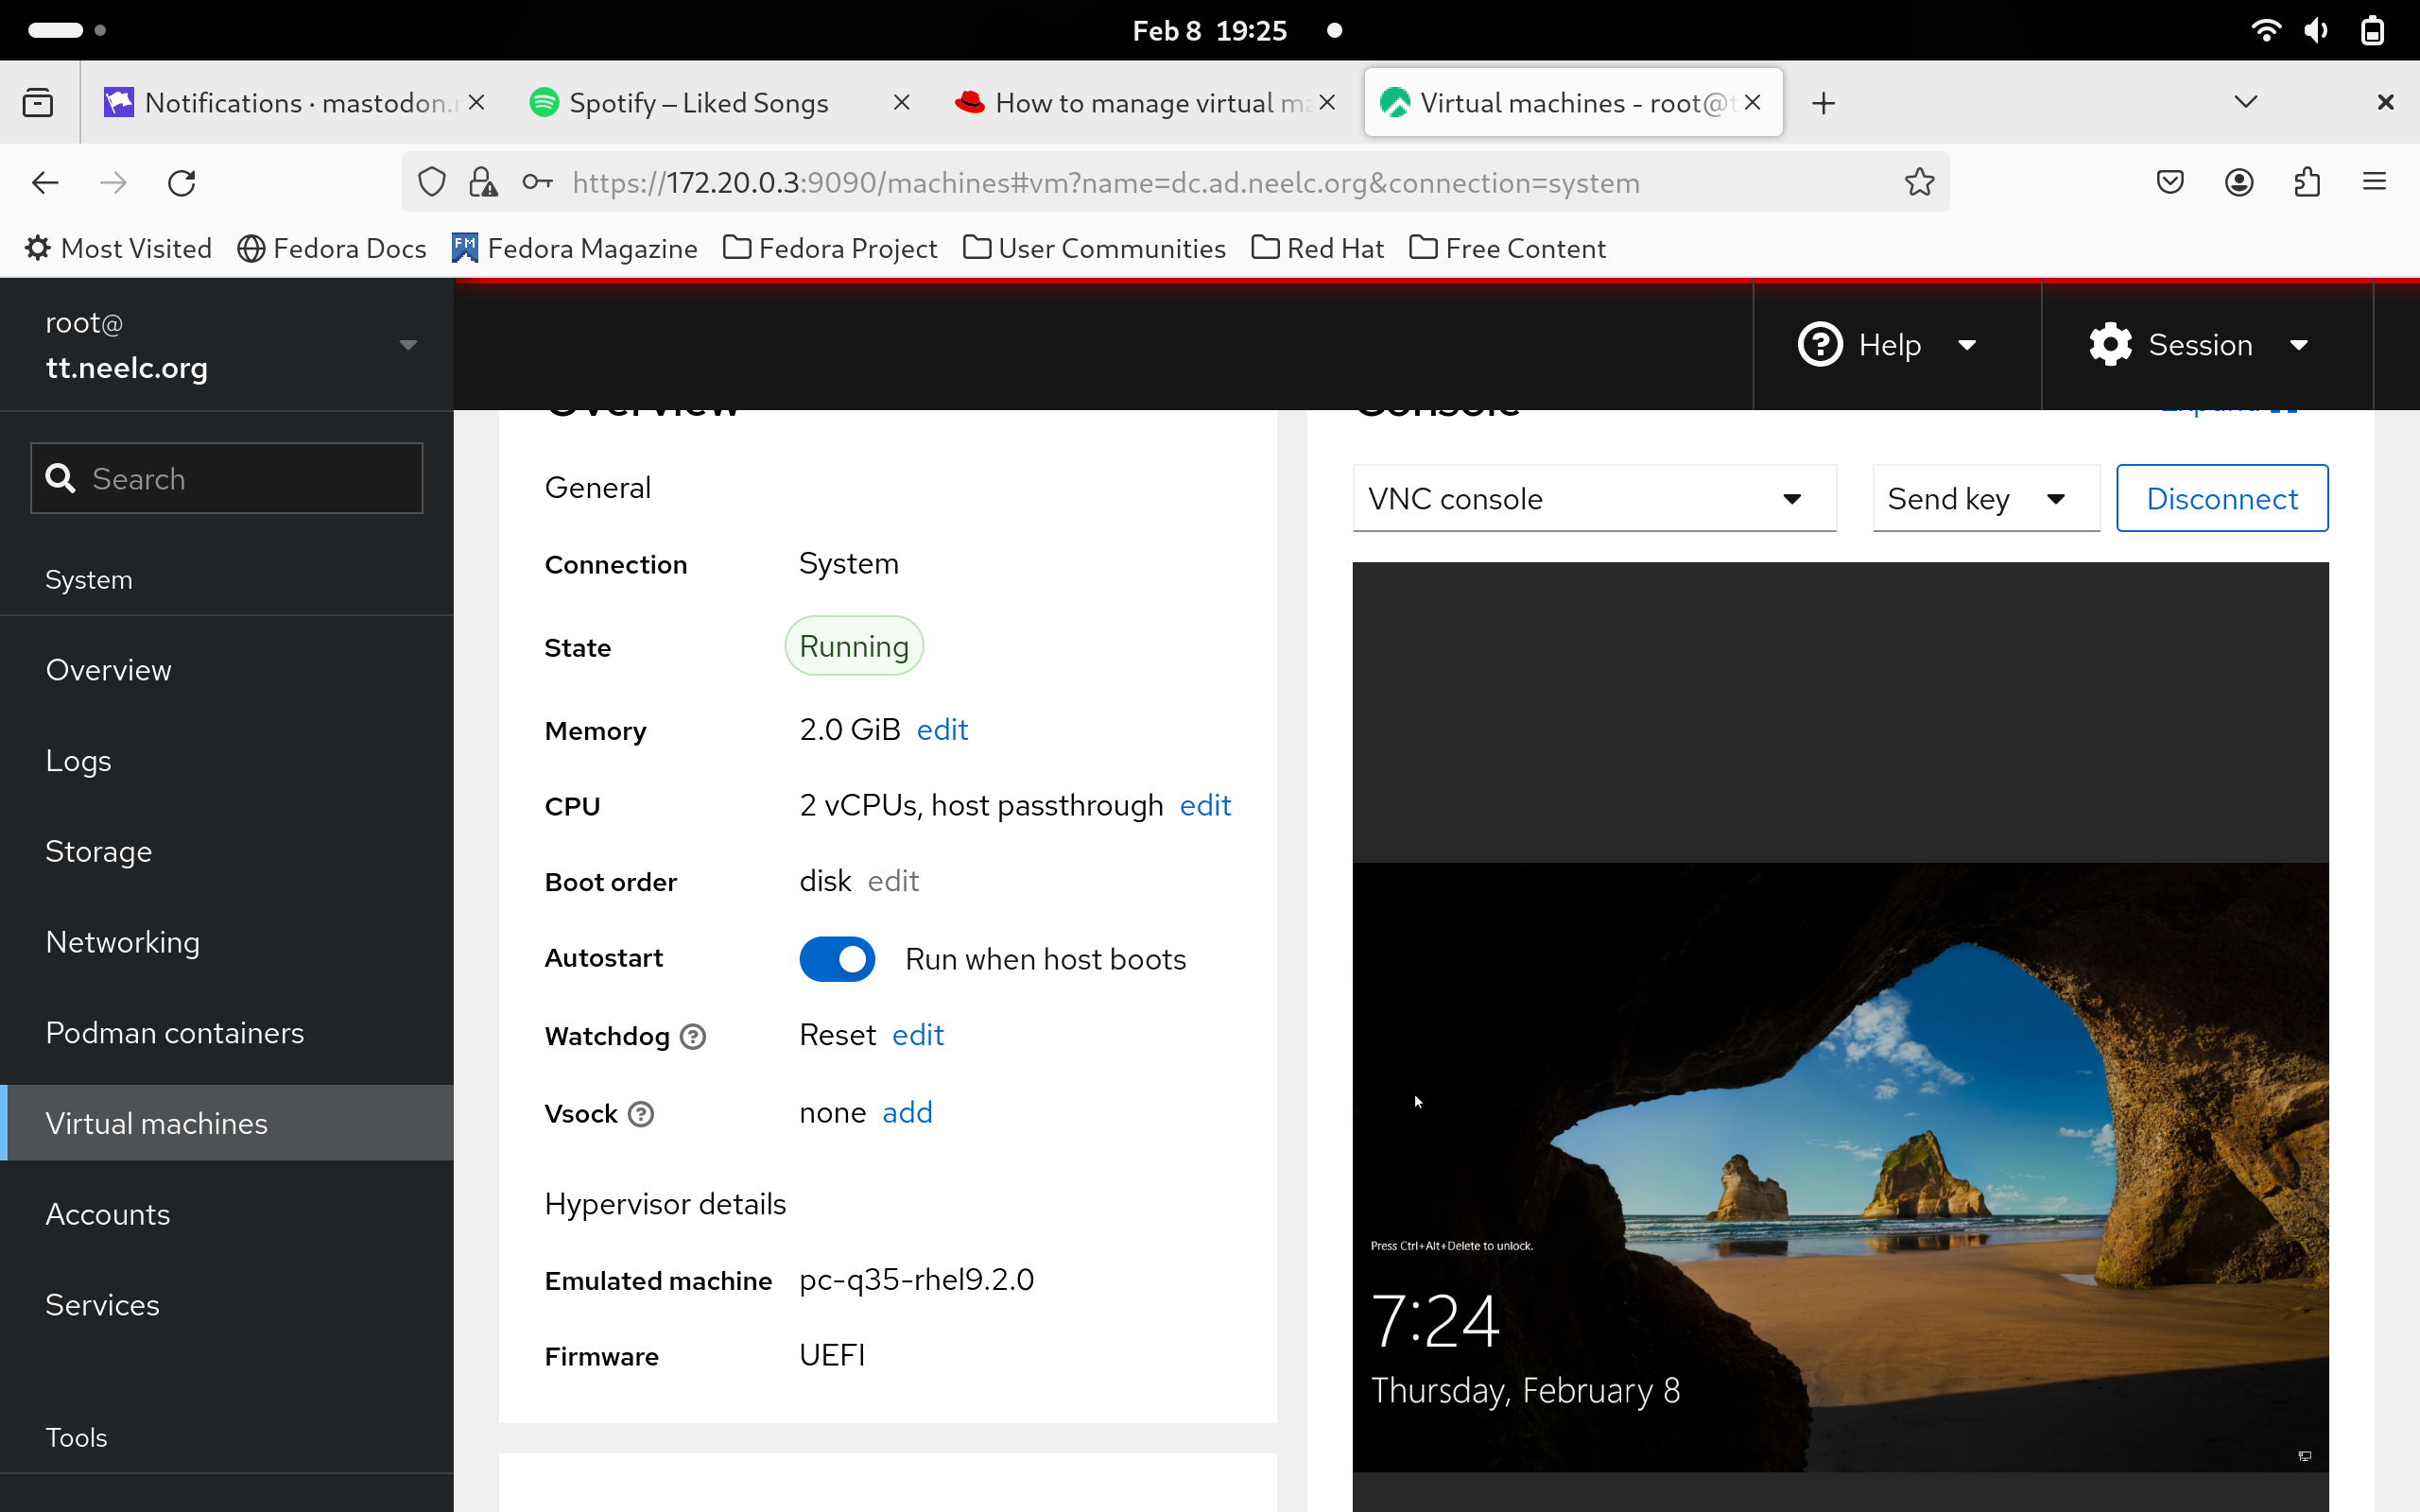 My Cockpit showing my Windows 2022 Domain Controller’s console